Monday, August 6, 2012

Chicken Soups from Around the World!


Over the past year and a half Oliver and I have been working our way through a cookbook that his parents gave us, which was written by their friend, Cat Cohen, titled Chicken Soups from Around the World.  It is a compilation of 52 recipes for soup that contain some form of chicken and are typical for specific nations around the world (and some US regions).  We created the occasion Chicken Soup Wednesdays in an effort to complete one recipe per week (when feasible with our crazy schedules). As we went we colored in a world map that we printed to track our progress.  We also wrote our reviews of each of the recipes in the book and kept track of our favorites.  I wanted to share my top 3 recipes here on the Savory Lab so that you can take a little mini soup trip of your own!


And the gold goes to......

Norway!

Hunsekjuttsuppe with Apples and Vegetables

This recipe is an easy-to-prepare light meal that balances sweet and savory flavors.  Who knew that apples and leaks would make such good soupfellows.

Prep Time: 15 mins
Cook Time: 30 mins
Total Time: 45 mins


Ingredients:
3 Tbls butter
1 leek, white portion only, cleaned and thinly sliced
1carrot, diced
1 parsnip, diced
3 Tbls flour
4 cups chicken broth
2 medium Granny Smith or other tart apples, peeled, and sliced
1 1/2 cups cooked chicken meat, diced
Salt and white pepper, to taste

Directions:
Melt butter in a saucepan and slowly saute leek, carrot and parsnip for a few minutes until they begin to soften but do not brown.
Stir in flour and cook for 5 minutes, stirring until well blended.
Add the broth, stirring vigorously.
Simmer gently for about 10 minutes or until soup is smooth and slightly thick.
Add apple slices and chicken meat, and simmer for about 10 minutes longer.
Season with salt and pepper.

Kenya

Chicken Soup with Eggplant, Okra & Peanut Butter

My browser took me on a culinary safari to find this delightful soup from the other side of the world.  Smooth or chunky, it’s the peanuttiest.

Prep Time: 15 mins
Cook Time: 30 mins
Total Time: 45 mins

Ingredients:
½ onion, chopped
3 cloves garlic, diced
1 cup eggplant, diced
1 oz olive oil
1 Tbls curry porder
1 tsp powdered chili
2 Tbls tomato paste (or 1 can tomato sauce)
1 cup chicken leftovers or thawed frozen breasts, sliced
5 cups chicken broth
1 cup peanut butter
1 can diced tomatoes
1 butternut, zucchini or other squash, diced
1 cup frozen okra
1 large potato, diced
1 oz. lime juice
Salt and pepper

Directions:
In a flying pan sauté the onions, garlic and eggplant in olive oil. 
Add curry and chili powders and tomato paste. 
Add the chicken meat and sauté until the chicken is cooked. 
Put aside to let the flavors mingle. 
Put the chicken broth in a large soup pot and bring to a boil, then reduce to simmer.  Add the tomatoes, peanut butter, potato, and squash and stir well. 
Bring to another boil and then lower to simmer. 
Add the chicken mixture, lime juice, salt and pepper and cook for another 20 minutes. 

Armenia

Chicken Rice Soup with Yogurt and Mint

Light and flavorful, this Middle Eastern recipe makes me feel healthy just thinking about it.  The creamy texture of the yogurt and hint of mint make this soup quite delightful.

Prep Time: 15 mins
Cook Time: 60 mins
Total Time: 75 mins

Ingredients:
1-2 cups chicken leftovers or thawed breast strips, sliced
1 onion, chopped
4 cloves garlic, minced
¼ cup parsley, chopped
3 celery stalks with greens, diced
1 carrot, finely diced
2 Tbls olive oil
5 cups chicken broth
½ cup uncooked rice
1 Tbls fresh or dried basil
1 Tbls fresh or dried oregano
Salt and pepper
1 cup zucchini, cubed
1 cup plain yogurt
1 egg
1 oz lemon juice
2 Tbls fresh or dried mint

Directions:
Sauté the chicken meat, onions, garlic, parsley, celery, and carrots in olive oil for a few minutes in a large soup pot or Dutch oven. 
Add the broth, rice and spices. 
Bring to a boil, cover and simmer for 45 minutes. 
Add the zucchini during the last 10 of these minutes. 
Combine yogurt, egg and lemon juice in a bowl and beat well. 
Add a small amount of broth to the warm it slightly. 
Slowly add the yogurt mixture to the soup along with the mint, warm slowly and turn off the heat. 
Serve with warm pita bread or lavash and some beet-colored pickled turnips (I did not have these and it was still fantastic!). 


Thanks so much for the adventure Cat! And we plan on continuing on our weekly joy of Chicken Soup Wednesdays using recipes we find online until our map is completely filled in. Woohoo!

Wednesday, March 7, 2012

Fagottini di Formaggio (Cheese Bundles)

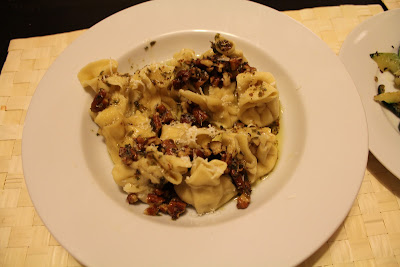
I have always wanted to make pasta at home from scratch, without any machines or professional pasta tools - get a true glimse of how the old Italian ladies used to do it back in the day.  I thought what better pasta creation to attempt than fagottinis!  This is a style of pasta that I fell head over heels for when I was studying abroad in Siena and have not been able to find a great replica of since I left that tasty country.  In Italian fagottini means little bundle...and crazy enough, that is exactly what they are!  After searching through many recipes online I came up with the following combinations based on my preferences and what I had in the house.  Honestly, this dish turned out better than most that I have had in any Italian restaurant in the states..and a close second to real Italian deal.  Feel free to follow the little old Italian lady inside of you and get creative with your own filling and sauce twists.  Buon appetito!


Yield: 4 servings
Prep Time: 40 mins
Cook Time: 20 hour
Total Time: 1 hour

Ingredients:
For the pasta: 
1 1/2 cups flour
two eggs and 1 egg yolk
1/2 tsp salt

For the filling:
½ cup gorgonzola
2 Tbls fresh cheese
1/2 tsp dried thyme
3 small garlic cloves
freshly ground black pepper
a bit of olive oil
one egg white

For the sauce:
100 g butter
½ cup roughly chopped pecans
1 Tbls chopped dried parsley
1 tsp chopped dried sage
1/4 cup + 2 Tbls heavy cream
1 tsp fresh lemon juice
Finely grated Parmesan for topping

To make the dough, combine the flour and salt in a large bowl.

Create a well in the center and add the eggs and egg yolk. Using a fork, beat the eggs while mixing in the flour a little at a time.

Turn the dough out onto a lightly floured work surface. Form into a ball and knead until the dough takes on a smooth surface, about 10 minutes. Form the dough into a ball and wrap in plastic wrap. Let it rest on your kitchen table while you're preparing the filling.


To make the filling, heat oil in a small pan over medium-high heat. Add garlic, cook until translucent. Combine in a bowl with gorgonzola, fresh cheese, thyme and season with salt and pepper. Add egg white and stir to combine.

To make the pasta, cut the ball into few pieces. Work with only one piece at a time and keep the remaining pieces wrapped in plastic wrap. Lightly flour the table and roll the piece of dough until the pasta is very thin. You may use pasta machine, too. Using a decorative pastry cutter or a sharp knife, cut the sheet into small squares of equal size. Using a teaspoon, drop balls of filling onto each square. Brush around the filling with a bit of water. Take the square in hand and form the fagottini - a bundle. Place them onto a lightly floured tray or towel. Repeat with the remaining pieces of dough.

Bring a large pot of liberally salted water to a rapid boil. Add the fagottini in small batches and cook until al dente, about 5 minutes.

Once you put the fagottini in the water start cooking the sauce. In a skillet over medium-high heat, cook the butter without stirring until it starts to darken to a golden color. Add the nuts and cook until the butter is golden brown and the nuts are fragrant (about 1 minute). Add the herbs, cream, and lemon juice, and stir to combine. Cook for 30 seconds. Season with salt and pepper.

Transfer the fagottini with a slotted spoon to the skillet with the butler, swirling to coat. Move to a bowl, sprinkle with the parmesan, spooning the sauce over the ravioli to melt the cheese.

Serve with pride and some nice white Italian wine! =)

(The only hastily taken photo of the final product before they were all devoured - so irresistible!)


Adapted from Duonos ir Zaidimu and many other sites...

Sunday, February 26, 2012

Cloning the Infamous Girl Scout Somoa

Yesterday I departed on a journey to recreate the cookie of legends, Girl Scout Samoas. I have to admit that these were some of the most time consuming tedious cookies I have ever made, but the results were pretty spot on with the originals. And a few bonuses of this recipe are that you also make Girl Scout Trefoils (shortbreads) in the process along with some Werther's Original-style caramels to enjoy on the side. A fruitful baking experience indeed!


Yield: 35-40 pieces of heaven
Prep Time: hours (depending on your skill)
Cook Time: hour(s) (depending on your equipment)
Total Time: It took me a better part of a Saturday

Ingredients:
Caramels
1 1/2 cups white sugar
1/2 cup brown sugar
396g (1 small can) sweetened condensed milk
4 Tbls butter + some for the baking pan
1 tsp vanilla

Shortbreads
227g (2 sticks) butter, room temperature
115g (1/2 cup) sugar
250g (2 cups) all-purpose flour
1/4 tsp baking powder
1/2 tsp salt
1/2 tsp vanilla extract
2 Tbls milk

Topping
225g (3 cups) shredded unsweetened coconut, toasted
425g soft caramels
1/4 tsp salt
3 Tbls milk
226g semisweet chocolate

Directions:
Step 1 – make the caramels
Apply a thin layer of butter to the inside of an 8-inch square baking pan, and set the pan aside.

Combine the sugars, sweetened condensed milk and butter in a large saucepan.

Cook the mixture over low heat, while stirring constantly, until it reaches 246 degrees (if you do not have a candy thermometer like me you can follow the testing instructions on the Exploratorium website to cook it to the “soft ball stage” http://www.exploratorium.edu/cooking/candy/sugar-stages.html). Be careful to avoid over-cooking your caramels, and burning yourself – this stuff is hot hot hot!

Remove the pan from the heat, and immediately stir in the vanilla.

Pour the hot caramel mixture into the buttered pan.

Let it cool to room temperature before cutting it with a sharp knife for use or eating.


This recipe makes a bit more than is needed for the Somoas so I used some wax paper to wrap up the extra pieces for eating later.


Step 2 – The Shortbread Story
Cream together your butter and sugar with a mixer until light and fluffy.

In a separate bowl, whisk together the flour, baking powder, and salt. Slowly add this to the butter mixture and mix until just incorporated.

Finally, at low speed, add in the milk and vanilla.

Separate the dough into halves, wrap in plastic or Tupperware and refrigerate until the dough is as firm as a stick of butter. (you can toast the coconut in step 3 - making the topping, while your dough is refrigerating).

Preheat your oven to 180C (350F) and line two baking sheets with parchment.

Roll out the cooled dough on a floured surface.


Once your dough is rolled to about 1/8" - 1/4" thickness, use a cookie cutter to cut out whatever shapes your heart desires. I used a cup with a bottle cap to shoot for the original Somoa ring shape. Re-roll the scraps and repeat until all dough is cut.

Bake your batches of cookies one sheet at a time for 10-12 minutes, rotating the cookie sheet halfway through baking to ensure even cooking. Cookies should be brown around the edges when they are done.

Cool your cookies on the sheet for about 5 minutes, and transfer to a wire rack.

Let cookie sheets cool between batches to get the right consistency.


Step 3 – Make the Topping
Preheat your oven to 180C (350F).

Toast the shredded coconut on a baking sheet for about 10-15 minutes, stirring frequently. Let cool while shaping and baking cookies.

(after your shortbreads are cooked and cooled)
In a saucepan, melt your caramels over low heat, with the salt and half of the milk stirring constantly.

Stir the toasted coconut into the caramel mixture. You can add the rest of the milk (more if needed, depending on your caramel) to get the right consistency of your topping. It should be malleable enough to easily spread over the top of your shortbreads

Step 4 – Top ‘em Up!
Set out your shortbreads on waxed paper. Using a knife, a pair of spoons, an offset spatula, or whatever works best for you to spread a generous amount of the caramel mixture on each of your cookies.


Step 5 – The Final Touch of Chocolaty Chocolateness
Break up the chocolate into small pieces, put them in a saucepan and heat on low, stirring constantly, until it is all thoroughly melted.

Dip the bottoms of your cookies into the chocolate or use a pastry brush to coat the bottom of each cookie, and then place them back on the waxed paper. I found that my cookies that had a very thin coating of chocolate on the bottom were the tastiest – a thick layer of chocolate overpowers the rest of the flavors of the cookie.

Use the remaining melted chocolate to drizzle over top of the cookies once they're all dipped. A spoon works for this, but a piping bag or the corner snipped off a plastic baggie makes 'em prettier.

That's it! If you don’t eat all of them right away, you can store them in an air tight container for later indulgence.


Caramels recipe adapted from The Victory Cookbook, Somoas adapated from Instructables.

Monday, February 20, 2012

Bavarian Brezel Pretzels

Oktoberfest Inspired Knotted Goodness!
The giant pretzels served at Oktoberfest in Munich and around Bavaria have grown to become one of my favorite features of the region (along with the iconic beer of course).  I tried to bring a little bit of this German goodness into my flat by using a few tricks I found online that bypass the need for the traditional ingredient of lye.  I have to say that these guys have got me fooled with their full pretzel flavor and texture along with an added homemade rustic look.  Let's prost to that!


Yield: 6 thick hand-size pretzels
Prep Time: 15 minutes
Idle Time: 30 minutes (optional)
Cook Time: 10 mins
Total Time: 25-55 mins

Ingredients:
1 package (2 tsp) active dry yeast
2 Tbls + 1 1/3 cup lukewarm water
80 g brown sugar (about 1/3 cup)
520 g flour (about 4 1/2 cups/520 grams)
6 Tbls baking soda
3 cups water

Directions:
In a large bowl dissolve yeast into 2 tablespoons of warm water. Stir in 1 1/3 cups warm water, brown sugar and flour. Knead dough until smooth and elastic (about 5 minutes with a hand mixer). I let the dough rise covered with plastic wrap for 30 minutes but the original recipe says this is not required.

Heat oven to 245 C (475 F), line a cookie sheet with parchment paper and sprinkle it with coarse ground sea salt.

In a large saucepan combine baking soda and water.  The water should be at least 2 inches deep, so depending on your pot you may need to add more water (for every additional cup of water add 2 more tablespoons of baking soda). Bring the soda and water mixture to a light boil and set heat to simmer, making sure the soda is well dissolved.

While the soda water mixture comes to a boil lightly flour a surface, tear off a tennis ball size of dough (smaller or larger depending on how big you want your pretzels and what you can fit in your saucepan). Roll a long thick pencil shape with your hands, pick up both ends, cross to form rabbit ears and then twist the ends and pull them back to the rest of the loop. Place aside on floured surface and let rise a few minutes.

Place pretzels one at a time in the water soda mixture for 10 seconds on each side or until the pretzel dough is light yellow in color. Remove the pretzel from boiling water and place onto a salted a cookie sheet (I used 2 spatulas to help me with this).


Salt the top of pretzels with more sea salt. Place cookie sheet with pretzels into the oven for 8 to 10 minutes or until pretzel is golden brown. Enjoy while warm.  I suggest pairing with a liter (!) of Oktoberfest beer and some spicy mustard for the full Bavarian pretzel experience!


adapted from theoktoberfest.com

Saturday, January 21, 2012

The Quest for the Perfect Homemade Hummus

Over the past 4 months I have been on a quest for the perfect hummus recipe. I have to attribute most of my understandings of hummus norms to the basic stuff from Mr. Trader Joe....


In an effort to make something similar on my own (partially out of lack of a TJs here in Switzerland, and partially out of curiosity on how to do it myself) I have searched for and tried countless recipes online. I have even gone through the trouble of bringing a tub of it back to Switzerland with me in my luggage from America and making some from scratch so I could try them side by side. Even then, it was tough to replicate it the stuff. But, the positive take on all of this hummus trial and error is that I have become quite familiar with the standard arsenal of ingredients for the standard hummus recipe and now have a better gauge of how tweaking the quantities of each will affect the final product. Now it just comes down to a game of odds, using guess and check (a much tastier version than I used to use in my elementary school math classes) to reach the final pinnacle of hummus perfection. Here is the attempt I made today, giving a first swing at using the slow cooker to do the dirty work while I was out running errands. In the end I also twisted up my standard recipe with some sundried tomato goodness. Feel free to stop before adding this in the end if you want to stick to hummus purity. My final call on today's hummus quest = umm umm good!


Today’s Hummus Recipe:
Yield: about 3 cups of heaven
Prep Time: 10 mins
Cook Time: 6-12 hours
Total Time: 30 hours + (includes idle chill time)

Ingredients:
3 cups cooked chickpeas (slow cooker recipe below)
¼-½ cup of the reserved slow cooker water (depending on your desired consistency)
4 cloves garlic
1 tsp freshly ground sea salt (+/- depending on your taste)
¼ cup tahini
Juice from ½ a lemon
1 tsp red wine vinegar
½ tsp white wine vinegar
2 tsp olive oil
½ tsp cumin

For the sundried tomato version:
2 Tbls pureed sun-dried tomatoes
1 tsp tomato paste
1 tsp dried basel flakes (or fresh if you have them!)
A handful of pinenuts (optional)

Place the chickpeas, garlic, and salt in your food processor. Process (scraping down the sides of the bowl occasionally) until all of the beans are generally ground up. Add the lemon juice, vinegars, cumin and cooking water. Process for about 30 seconds to 1 minute then add the tahini. Process for a minute or 2 more, scraping down the sides of the bowl. Drizzle in the olive oil and process until the hummus is as smooth as you like it. Add in more cooking water to get it to the right consistency.


Transfer over to a bowl and if you are making the sundried tomato version you can mix all of those ingredients in now with a spoon. Enjoy!


Slow cooker chickpeas:
1 cup dried chickpeas
6 cups water
A few pinches of baking soda
2 cloves garlic
A splash of olive oil

Rinse the dried chickpeas well then soak them in two cups of the water with a sprinkle of baking soda overnight. The next day drain the chickpeas, then place them with the garlic, and the olive oil in your slow cooker. Add the rest of the water (enough to cover the chickpeas by a least a few inches), then place the lid on and turn the slow-cooker to low for 12 hours or high for 6 hours. Cook them until the chickpeas have almost no resistance when you squish one between your fingers. Turn off the slow cooker and drain the chickpeas, reserving the liquid in a bowl.

Sunday, January 15, 2012

The Best (non-Hyperbole) Chocolate Chip Cookies....Ever!!

I am finally sitting down to start this blog, and I figured what better recipe to kick it off with than the most amazing chocolate chip cookies in the world! I found this recipe through lots of online research - a skill that I picked up in grad school and have perfected to an even higher level when it comes to using it for the really important stuff - food!

A quick summary of these cookies - they are epic (and yes, I fully mean cookies that could inspire Homer to write another Iliad)! After I made them I took a large plate to a housewarming party and they were gone within an hour of arriving! And let's just say that the case for the cookies that I left at home was not much different. I must warn you that these cookies have the power to weaken even the strongest of wills when it comes to self-control. I think it must have something to do with the way that the tiny flakes of sea salt complement the dark chocolate chunks - they are an unbeatable pair! I fully endorse this recipe but I will leave with the disclosure that I am not at all responsible for the expanding waste-lines and the tight pants that it may induce; in my opinion, a minor consequence for a taste (or two, or three...) of the best chocolate chip cookies ever!!


The Best (non-Hyperbole) Chocolate Chip Cookies
Yield: 4 dozen (+/- depending on your scoop size)
Prep Time: 20 min
Cook Time: 14 min
Total Time: 25 hours (includes idle chill time)
You must respect the 24 hour chill time and cold cookie sheet rules in order for this recipe to turn out as amazing as it should!

Ingredients:
482 g flour (you can do half cake flour and half all-purpose if you have both – I used 100% all-purpose and they were great!)
1 1/4 tsp baking soda
1 1/2 tsp baking powder
1 1/2 tsp coarse salt
283 g (2.5 sticks) unsalted butter (at room temperature or course)
284 g light brown sugar (we don’t have this here so I make it – mix 1 Tbsp molasses for every 1 cup granulated sugar. How easy is that!)
227 g granulated sugar
2 large eggs (at room temperature)
2 tsp natural vanilla extract (we don’t have this either but I always bring back a bottle from the states when I visit)
567 g dark chocolate (I get the bars here and break them up by hand – the Swiss don’t do “chip” form – that would be insulting!)
Sea salt for sprinkling (DO NOT forget this!)

Directions:
Wisk together or sift flour(s), baking soda, baking powder and salt into a medium sized bowl. Put off to the side.
Using a hand mixer to cream butter and sugars together. About 5 minutes or until light colored.
Add eggs, mix well. Add vanilla and mix well.
Add dry ingredients in batches and mix until just combined, 10 to 20 seconds. Do not overmix.
Add dark chocolate and mix to incorporate gently. Do not overmix.
Transfer dough to another bowl and cover with plastic wrap (put it directly on dough to seal).
Refrigerate for at least 24 hours before baking.
After the oh-so-tough waiting period, preheat the oven to 177 C (350 F) degrees and line your baking sheets with parchment paper (using 2 is ideal but I only have 1). Scoop 8-10 balls of dough using a tablespoon and place onto a baking sheet. Be sure to leave at least 2 inches between each cookie dough scoop.
Add sea salt lightly on top of each cookie and bake until golden brown, 11-15 minutes, depending on the accuracy of your oven and the desired final texture of your cookies (11 for chewy - 15 for crispy).
Place sheet on a cooling rack for 5 minutes, and then remove cookies and place on another cooling rack to allow the cookies to cool even more.
Repeat with a fully cooled cookie sheet. Since I only have one sheet, I placed the dough back in the fridge while waiting for the sheet to cool after every batch before reloading it and baking.
Enjoy! =)


Slightly adapted from The Little Kitchen, slightly adapted from The New York Times, originally adapted from Jacques Torres (this long chain represents an evolution towards cookie perfection my friend!)